
Welcome to the world of ecommerce migration. Moving your website to Shopify, one of the most popular and powerful e-commerce platforms, can unlock new growth opportunities, improve day-to-day operations, and give you more control over your business. But getting there takes planning.
The process often involves transferring years of data: products, order history, customers, and more, to a completely new system. You’ll also need to set up your Shopify store from scratch, including theme design, payment and shipping settings, and third-party app integration. It's a big move, and there's a lot at stake.
Done right, it’s a chance to simplify how you run your store and set your business up for long-term success. Done poorly, it can result in broken links, lost SEO rankings, and a bumpy experience for your customers.
That’s why I’ve created this step-by-step Shopify migration checklist, tailored for Australian e-commerce businesses. Whether you’re moving from Neto, WooCommerce, Magento or BigCommerce, this guide will help you plan with confidence, avoiding common mistakes, preserving your data and SEO, and launching a store that’s ready to grow.
Find out how Shopify migration experts can take the stress out of your move
Why businesses move to Shopify (and why it might be time for you too)
If your current platform feels clunky, hard to update, or limited in what it can do, it could be holding your business back. Many Australian ecommerce brands I work with reach a point where their existing system no longer supports their next phase of growth. Whether it’s slow performance, backend complexity, or relying too much on developers for small updates, these challenges tend to pile up.
That’s when many brands start looking at Shopify. Here’s why it’s often the go-to next step:
- Easy to manage, even without technical skills: Shopify’s clean, intuitive admin makes tasks like updating content, managing products, or processing orders feel simple, no developer needed.
- Built for growth: The platform scales with you, whether you’re just starting out or expanding to new sales channels.
- Massive app ecosystem: From shipping and SEO to accounting, subscriptions, and email marketing, there’s an app for just about everything, and most are plug-and-play.
- Reliable under pressure: Shopify handles high traffic with ease and integrates smoothly with major channels like eBay, Amazon, and Google Shopping.

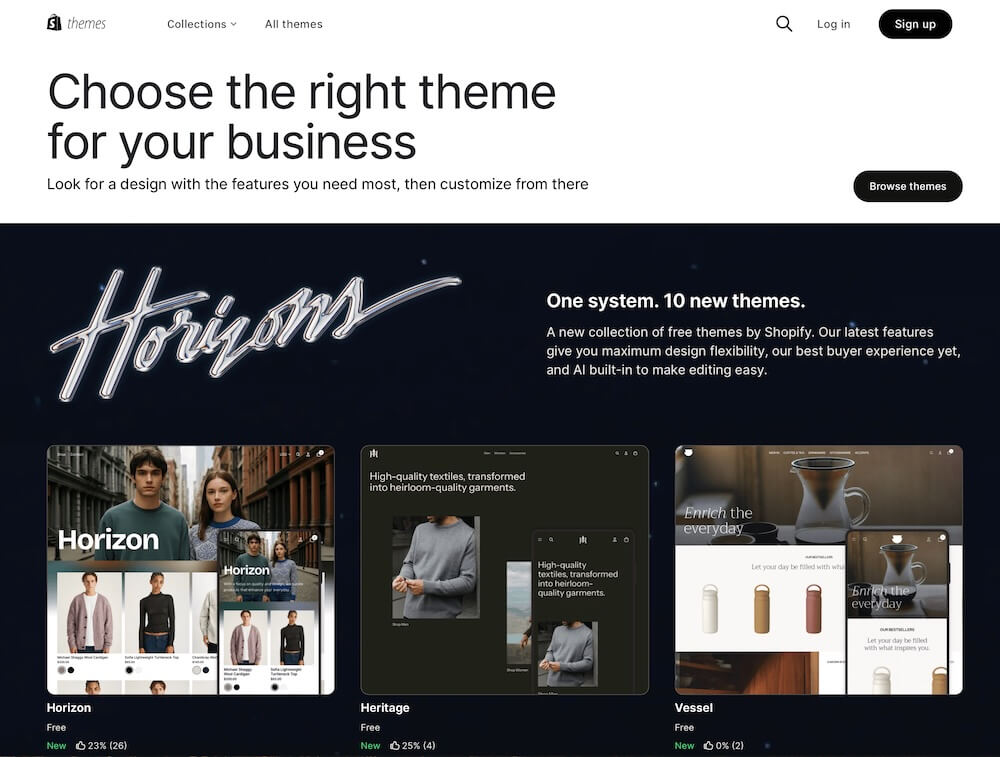
Shopify’s theme editor makes it easy to customise your store, no coding needed
Before you start: choose the right Shopify plan
Before you dive into setting up your new store, you’ll need to choose the Shopify plan that best fits your business. Each plan comes with different features and limitations, so taking the time to compare them upfront can save you from surprises later.
Here’s a quick overview:
- Shopify Basic is great for startups and smaller brands. It includes all the essentials to get up and running, such as a full online store and standard reporting.
- Shopify Grow suits most growing businesses. It offers more advanced reporting, additional staff accounts, and tools that support smoother operations.
- Advanced Shopify works best for more established stores looking to scale. It includes detailed reports and extra features like third-party calculated shipping rates and custom reporting.
- Shopify Plus is designed for high-growth and enterprise-level businesses. It includes advanced automation tools, custom checkout options, built-in B2B functionality, and access to priority support. If you're expanding quickly or juggling both retail and wholesale, this plan is worth considering.
PRO TIP: Shopify's transaction fees vary by plan. If you're processing a high-volume of sales, the fee savings on higher-tier plan, or even Shopify Plus, can outweigh the monthly subscription cost. Do the maths before making a final decision.
The ultimate Shopify migration checklist (step by step)
Once you’ve chosen the right Shopify plan, it’s time to get organised and map out your migration. Platform changes aren't something to wing without a clear roadmap, it's easy to miss critial steps like SEO redirects, data mismatches, or payment settings that haven't been tested. These issues can lead to broken links, frustrated customers, or lost sales.
This checklist gives you a big-picture view of what needs to happen during a Shopify migration. Whether your store setup is simple or more complex, having a clear roadmap will help you stay on track and move forward with confidence.

Step 1 – Create a migration plan
Start by understanding your current setup and defining what a successful move looks like. A clear migration plan will help you avoid surprises and make confident decisions at each step.
Review your current platform and store performance:
- Identify what’s working well and worth keeping.
- Note down what needs improvement or could be simplified.
- List out any features or workflows you want to replicate or improve in Shopify.
Set clear goals for your migration:
- What are your top priorities: improving conversion, boosting speed, reducing maintenance?
- How will you measure success after the move: sales lift, fewer support tickets, faster updates?
Build your migration team:
- Assign internal roles: you might need a project lead, content editor, and someone to test the new site.
- Consider hiring external support: Shopify experts can help with data migration, theme development, or third-party integrations if needed.
Define your timeline and budget:
- Break down the migration into key milestones: data prep, Shopify build, testing, and launch.
- Schedule the launch outside of peak periods to reduce risk.
- Estimate both one-off and ongoing costs, including themes, apps, Shopify plan, and potential expert support.
Step 2 – Set up your Shopify store
Once you’ve mapped out your migration plan, it’s time to lay the foundation of your new Shopify store. Choosing the right setup early on will save you time, reduce rework, and help your new site run smoothly from day one.
Choose and customise your theme:
- Pick a theme that aligns with your brand and product range. Start with one that’s well-reviewed, fast-loading, and mobile-friendly.
- Use Shopify’s preview tools to see how your products look in the theme.
- Customise colours, fonts, sections, and layouts to reflect your brand, but keep it clean and user-friendly.
Configure essential store settings:
- Set up payment options including credit cards, Apple Pay, Google Pay, Paypal, and Buy Now Pay Later options.
- Define shipping zones and rates, and consider free shipping thresholds if they fit your strategy.
- Use Shopify’s built-in tax settings to configure tax rules for different regions.
- Add required legal pages such as returns policy, privacy policy, and terms of service.
Enhance your checkout experience:
- Enable Shopify’s one-page checkout for a faster buying process.
- Customise your checkout to match your branding with your logo and colours.
Install essential apps:
- Search and filtering (e.g. product filters to help customers browse).
- Product reviews (e.g. Judge.me or Loox).
- Email marketing (e.g. Klaviyo).
- Google Shopping Feed (e.g. Simprosys).
- Cart and upsell tools (e.g. UpCart or ReConvert).
PRO TIP: Test each app before committing. Some may slow down your store or conflict with other apps, focus on what’s essential and keep things lean.
Step 3 – Migrate your data
Your store’s data is its backbone, and migrating it properly is one of the most critical steps in the entire process. This includes everything from product info and customer records to past orders and blog content. Done right, you’ll carry your store’s history into a faster, more scalable system without disruptions.

Prepare your data:
- Back up everything: product info, images, customer records, and order history
- Decide what data and content you want to move: products, customers, orders, blogs, and pages)
- Clean and organise your data before migration:
- Remove outdated or discontinued products
- Fix inconsistencies in product names or variants
- Remove duplicate or inactive customers
- Clean and reformat HTML where needed
Choose your migration method:
Depending on your store size, complexity, and how hands-on you want to be, you can choose:
- Manual transfer: good for small, simple stores. You’ll need to copy and paste or re-enter details manually.
- CSV import: Shopify supports structured CSV files for importing products, customers, and more.
- Migration apps: tools like Matrixify, LitExtension, or Cart2Cart handle bulk transfers with less hassle.
- API integration: ideal for large-scale or complex setups. Requires a developer but offers full control.
Import your data in the correct sequence (products, customer and order data):
- Start with products, then move on to customers, then orders.
- Blog posts, CMS pages, and other content can be added after.
- Run a test import first to catch any issues early, like formatting problems, missing links, or mismatched data.
- After testing, proceed with the full migration, monitor each step closely to ensure all products, customer records, and orders are imported correctly without errors.
Don’t forget your SEO when migrating data. Protect your rankings during the move:
Maintaining your search engine visibility is just as important as transferring your data. Here’s how to preserve your SEO as you migrate:
- Transfer metadata: Bring over all page titles, meta descriptions, and image alt text to keep your search context intact.
- Use canonical tags: Make sure canonical URLs are properly applied to avoid duplicate content issues.
- Set up 301 redirects: Ensure old URLs automatically point to their new Shopify counterparts so customers and Google can still find your content.
- In Shopify, go to Online Store > Navigation > URL Redirects, then input your old and new URLs
- You can also upload redirects in bulk using a CSV or app if you have many pages

Post-import checks:
- Verify that product info, inventory levels, customer details, and order history are accurate.
- Test all key data relationships: products linked to collections, customers linked to orders, and images properly attached.
Step 4 – Test your new setup
Now that your Shopify store is complete with your theme set up and your own data successfully migrated, it’s time to review every aspect of your store using real content. This is your opportunity to catch anything that looks off, feels clunky, or doesn’t work as expected.
Test store functionality:
- Review key pages like the homepage, product pages, collections, cart, and checkout.
- Check that all migrated product details: titles, descriptions, images, variants, and pricing are displaying correctly.
- Test core processes such as add-to-cart, checkout, and order confirmation across multiple devices and browsers.
- Verify store emails: ensure order confirmation, shipping, and customer account emails are being triggered correctly and reflect your brand voice.
Test user experience:
- Navigate the site as a shopper would, on desktop and mobile. Does everything feel intuitive?
- Review your navigation structure: are your main categories easy to find?
- Check that links and buttons are working, and that call-to-actions are clear.
Place test orders:
- Run multiple test orders using different payment methods, discount codes, and shipping options to make sure everything works.
- Check what happens post-purchase: do customers get redirected to a thank-you page? Are they receiving their emails? Is everything tracked in your dashboard?
Run a soft launch:
- Invite a small group of team members, stakeholders, or trusted customers to browse and test the site.
- Collect feedback on both design and functionality, and make final tweaks where needed.
PRO TIP: It’s easy to overlook small issues when you’ve been immersed in the build process. A second pair of eyes, or several, can help you spot things you might have missed.
Step 5 – Plan your launch
With everything set up and tested, it’s time to prepare for go-live. A smooth go-live depends on careful timing, clear communication, and a few last checks to ensure everything runs without a hitch.
Prepare for go-live:
- Align all stakeholders: confirm your team and any third-party providers (like shipping or payments) know your launch date and are ready to support the process if needed.
- Inform customers ahead of time so they’re not surprised by the change, and use it as a chance to build excitement for the new site.
- Set up an under-construction page to let visitors know your site is temporarily unavailable, and that something new is on the way. If you're running paid ads (like Google Ads or Meta), pause them temporarily to avoid sending traffic to a non-functional site.
- Double-check key settings like payment, tax rules, shipping rates, and email notifications.

Step 6 – Go live
It’s launch time. Now that everything is in place, these final actions will help ensure your store goes live smoothly and successfully.
Go live:
- Switch your domain and update DNS records, these changes can take a few hours to fully propagate, so plan accordingly.
- Remove the Shopify password so your store is publicly accessible. This is a common step store owners forget after development.
- Test key flows in real time: confirm checkout, apps, and customer journeys are working as expected.
- Submit your sitemap to Google Search Console so your new pages can be indexed quickly.
- Check 301 redirects: verify that they’re working and no important links are broken.
- Monitor incoming orders: check that they appear in your admin, trigger confirmation emails, and are syncing to any third-party tools.
- Test and monitor contact forms to ensure enquiries are being delivered to your inbox or CRM.
- Watch analytics and error logs during the first 24–48 hours to catch any unexpected issues early.
Reconnect with customers:
- Announce your new store to existing customers via email and social media.
- Encourage customers to reactivate their accounts and explore the updated experience.
- Invite feedback to uncover any usability issues and show customers that their opinions matter.
Step 7 – After go-live: Monitor, optimise, and grow
Once your new Shopify store is live, the work doesn’t stop there. The post-launch period is a crucial time to track performance, fix small issues, and keep improving.
- Check site performance and speed: Use tools like Google PageSpeed Insights or Shopify’s built-in reports to benchmark your site speed across desktop and mobile, and identify opportunities to improve loading times.
- Track key metrics: Monitor sales, bounce rates, and conversion data through Google Analytics and Shopify reports to spot trends early.
- Watch for SEO changes: Check Google Search Console for crawl errors, indexing issues, or sudden drops in rankings.
- Listen to your customers: Gather feedback on the new experience, what’s working, what’s confusing, and use it to make improvements.
- Continue optimising: Tweak content, update product details, improve collections, and test new features now that your store is live.

Don't make these mistakes (and how to avoid them)
Even well-planned migrations can run into trouble if common pitfalls are overlooked. Having migrated dozens of stores to Shopify, I’ve seen how small missteps can turn into big issues, but most are preventable. Here are some of the most common mistakes and how to steer clear of them:
- Inadequate planning: Misjudging the scope of work can lead to rushed decisions and delays. Start with a clear plan that breaks down each phase, assigns responsibilities, and sets realistic timelines.
- Data migration issues: Data can be lost or corrupted during the transfer. Always back up your data, test migrations on a small scale first, and use reliable migration tools or professional services to reduce risks.
- SEO disruptions: Forgetting to implement redirects or transfer SEO metadata can damage your rankings. Set up 301 redirects for all key pages and double-check that your metadata and structured data carry over properly.
- Design and UX inconsistencies: Changing too much at once can confuse returning customers. Preserve what already works, and ensure the new design is mobile-friendly, brand-consistent, and intuitive to use.
- Customer communication gaps: Not informing customers about the migration or new login process can lead to confusion. Keep them in the loop, especially if they’ll need to reactivate accounts or update details.
Taking the time to plan thoroughly, test early, and communicate clearly can save you a lot of stress and help your launch go off without a hitch.
Should you DIY or hire help? Shopify migration services vs DIY

One of the biggest decisions you'll face is whether to handle the migration yourself or work with a Shopify expert. Now that you’ve seen what’s involved, you might be wondering: is this something I can tackle in-house, or would expert help save me time and stress?
While DIY can look cost-effective at first, it often takes more time and effort than expected, even for tech-savvy e-commerce store owners. You’ll need to:
- Clean up and restructure your data (e.g. remove outdated products, merge duplicates)
- Recreate customer groups and pricing rules
- Rebuild custom features like forms, blogs, or page layouts in your new Shopify theme
- Migrate product, customer, and order data accurately using the right method for your store size and complexity
- Set up integrations for payments, shipping, email, and more
- Implement 301 redirects to maintain your search engine rankings
- Test every key function thoroughly from browsing and checkout to emails and account logins
If your store is large, customised, or integrated with other systems, DIY migration can quickly become complex and time-consuming.
Many Australian brands I work with choose expert help because it saves time, reduces risk, and sets them up with a stronger foundation for growth. In most cases, the investment pays off through a faster, smoother transition, with fewer post-launch issues.
Conclusion
Migrating to Shopify can sound overwhelming, but with the right plan, it can be one of the most impactful upgrades you make for your business. From picking the right Shopify plan and designing a user-friendly store, to ensuring your SEO and data are protected, every step you take contributes to a smoother launch and a stronger foundation.
If you’ve made it this far, you now have a clear roadmap to follow. Take your time, avoid the common pitfalls, and focus on giving your customers a seamless experience.
Need a hand? If you’d like expert support or simply want peace of mind during your migration, I invite you to work with trusted Shopify migration experts. Whether you're coming from Neto (by Maropost), Magento, WooCommerce, or BigCommerce, I can help make the switch as seamless as possible.
You don’t have to do it alone, and you shouldn’t have to.
Shopify Migration Checklist FAQ
Can I migrate to Shopify myself or do I need expert help?
Yes, many store owners explore the DIY route, but it depends on your setup. If your store is simple and you’re confident with technical tasks, DIY might work. But if you’re dealing with custom features, legacy data, or SEO considerations, working with a Shopify migration expert can save time and avoid costly issues.
What’s the best way to back up my data before migrating?
Most platforms let you export product, customer, and order data via CSV. You should back up all product details, images, customer data, blog content, and order history. Store copies securely, both locally and in the cloud.
What kind of data can be migrated: products, orders, customers?
Typically, you can migrate products, customers, historical orders, blog content, pages, and even gift cards. Some fields may need formatting or custom mapping, depending on how your original platform stores the data.
Do I need to rebuild my entire website when migrating to Shopify?
Yes, most of your design and theme will need to be recreated in Shopify. While you can carry over content, navigation, and page structure, Shopify has its own theming system. It's a great chance to refresh your brand and improve UX.
How do I migrate products, customer and order data to Shopify?
There are several options: manual entry, CSV import, using migration apps like Matrixify or Cart2Cart, or custom API integrations. The right method depends on your data complexity, volume, and technical comfort level.
How long does it take to migrate to Shopify?
Most migrations take 2–6 weeks depending on your store’s size, complexity, and how much needs to be customised. Larger stores with more data or integrations may take longer.
What apps do I need to install when I move to Shopify?
It depends on your needs, but most stores benefit from a product filter/search app, a review app (like Judge.me), email marketing tools (like Klaviyo), and a Google Shopping feed app. Only install what’s essential and test for performance.
How do I test everything before launching my new store?
Test all key functions: browsing, cart, checkout, payment, and emails. Do this on multiple devices. Also place test orders and consider a soft launch to a small audience before going fully live.
Can I keep my SEO rankings after switching to Shopify?
Yes, if you migrate properly. Use 301 redirects for all old URLs, carry over meta titles/descriptions, submit your sitemap to Google Search Console, and monitor your rankings post-launch.
What is a post-migration checklist?
This includes final tasks like checking redirects, verifying analytics tracking, testing emails and checkout, reconnecting apps, and informing customers. It ensures your store functions correctly and nothing slips through the cracks.
Explore more on Shopify migration topic
- Best ecommerce platform for small business: Shopify vs BigCommerce vs Magento vs WooCommerce
- Neto vs Shopify: What Australian retailers need to know before switching platforms
- Shopify plan comparison: which option is right for your business
- Why move to Shopify? 8 compelling reasons to make the switch
- Top 8 common Shopify migration mistakes (and how to avoid them)
- Shopify data migration: Move key data without losing SEO rankings or disrupting your store
- WooCommerce to Shopify migration: A complete guide for a smooth, SEO-safe move

Leave a comment
This site is protected by hCaptcha and the hCaptcha Privacy Policy and Terms of Service apply.